Superior Court of Justice — Digital Hearing Workspace User Guide
To print a copy of the guide, use the PDF version.
March 6, 2019
1 Introduction
The Digital Hearing Workspace (DHW) is an online document management platform that enables parties to submit electronic copies of materials required for a hearing and provides authorized parties with 24/7 instantaneous access to event-related documents.
The platform was developed and enhanced in consultation with users, including judges, lawyers and ministry staff.
The DHW platform allows:
- Court staff to create workspaces for cases and schedule hearings
- Parties or their representatives to upload and share electronic copies of court documents for upcoming scheduled hearings
- Judicial officials to access electronic documents online without the need to transport physical files and/or USBs
- Judicial officials and court staff to upload and share court orders or decisions.
The DHW is not a court filing service. Documents shared in the workspace are not considered filed with the court and must be filed at the courthouse in accordance with the Rules of Civil Procedure and applicable Practice Directions. The paper court documents filed will continue to be considered the official court record.
1.1 Platform Requirements
To use the DHW, you must:
- Access the platform via Google Chrome or Internet Explorer
- Ensure that pop-ups are enabled within your browser
- Upload documents only in PDF, Word, Excel or PowerPoint format
- Ensure that anti-virus programs and security patches on your computer are current.
1.2 Technical Support
For technical support during regular business hours, please email MAGinnovation@ontario.ca.
2 Registering for the Digital Hearing Workspace
As a representative or self-represented litigant who has been assigned to a DHW for a case, you will be sent an email requesting you to register for that workspace. After you complete your registration, court staff will be required to approve your registration through the DHW platform. You will be able to access the DHW for a case and upload documents only after the court approves your registration.
Follow the steps below after you receive an email with a link to register for the DHW.
- Click on the “Get Started” button in your email and you will be brought to the following page:

- Select Microsoft account.
- You must create a Microsoft account in order to access the DHW platform. If you don’t have an account, click on “Create one!”. If you already have a Microsoft account associated with your email address, sign in and click on “Next” and proceed to step 5.

- Follow the online instructions to create your account.
- After creating your account or signing in, complete the information on the Workspace Registration page:

- Click submit to finish the registration process.
Each time you log into the DHW platform you will be brought to the Terms of Use page for the DHW and you must accept and agree to the terms in order to continue to the platform.
Note: The password used to access the DHW is the password for your Microsoft account and email. Changing your password must be done through your email or Microsoft account.
Note: Please ensure that passwords for the DHW platform remain secure and confidential and are not shared with anyone without authorized access to the platform.
Note: Security protocols enabled by you and/or your organization may prevent you from registering with an existing email address. Should you encounter this issue, please create or use an alternate email account as noted above and discuss with your IT support organization (if applicable).
3 Understanding the Digital Hearing Workspace Homepage
Once logged in, you will automatically be brought to the homepage of the DHW platform. The DHW homepage is split into two sections:
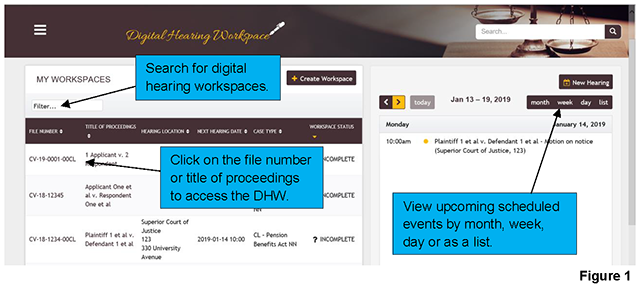
- My Workspaces – On the left hand side of the screen, you will find all the workspaces for cases that have been assigned to you which can be accessed by clicking on the file number or title of proceedings. You can search for a workspace by either using the sort function on the columns or the search feature. [Figure 1]
- Calendar – On the right hand side of the screen is a calendar that shows all events that have been scheduled for your cases. The calendar may be viewed by month, week, day or as a list by date. [Figure 1]
The main menu on the homepage will allow you to navigate to other pages in the DHW platform. [Figure 2]
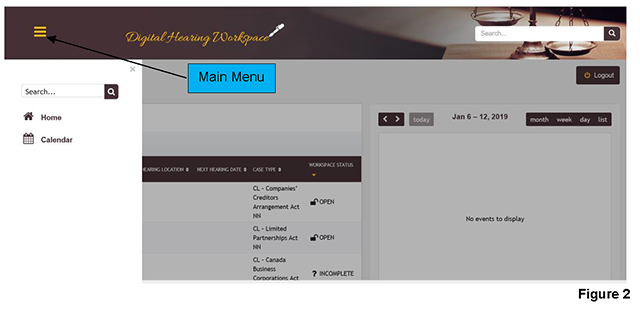
The options available from the main menu are:
- Home – returns to the homepage of the DHW platform
- Calendar – view upcoming events scheduled in a calendar format.
4 Accessing the Digital Hearing Workspace of a Case
DHWs that have been assigned to you may be accessed through the homepage or through the calendar. Clicking on the case file number or title of proceedings will bring you to the case landing page for the workspace of that case. [see Figure 1]
The case landing page of a workspace provides an overview of the case including basic case information, saved drafts, and documents uploaded by users. [Figure 3]
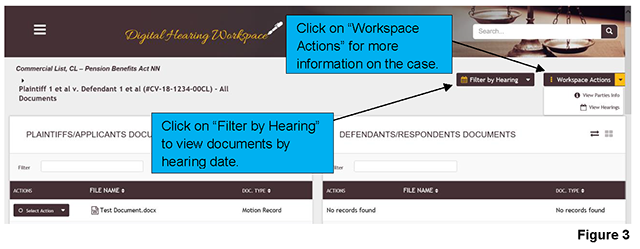
For additional information or actions within a workspace, click on the “Workspace Actions” drop down menu to:
- View Party Info – lists all the parties and representatives in the case
- View Hearings – lists all hearings scheduled in the case.
To filter documents shared by hearing date, click on the “Filter by Hearing” drop down menu.
5 Uploading, Sharing and Assigning Documents
You will be able to upload documents as drafts for upcoming court events in the DHW of cases that have been assigned to you. You can either create a new document within the workspace or add a document by uploading the file directly from your computer to the DHW. Files that are added to a workspace or created within a workspace are saved as drafts and appear in the “CREATE / UPLOAD DOCUMENTS” section of the case’s workspace. Documents that are in draft are only accessible to the person that added or created the file. The file will only be made available to all users assigned to a workspace once you have shared the file.
Please make note of the following important information:
- The DHW is not a court filing service. Documents shared in the workspace are not considered filed with the court and must be filed at the courthouse in accordance with the Rules of Civil Procedure and applicable Practice Directions. The paper court documents filed will continue to be considered the official court record.
- It is the responsibility of the user sharing a document in the DHW to ensure that it is the same as the paper copy filed with the court.
- Documents subject to a sealing order, or for which a request for a sealing order will be made, must not be uploaded and shared in the DHW. Such documents should be submitted to the court in the normal fashion for confidential documents. If a sealing order is granted, the uploaded document cannot be easily removed from the DHW platform.
- Only documents for the purposes of an upcoming scheduled hearing should be uploaded and shared in the DHW. Documents containing sensitive information, such as counsel notes or advice that is subject to solicitor-client or litigation privilege, should not be uploaded and shared in the DHW.
- Users should create and edit documents outside of the DHW platform as much as possible and only upload documents that are considered to be final versions.
- Users should preview their documents prior to sharing to ensure the correct document is being shared. Once a document has been shared, it cannot be easily removed from the DHW.
- Users must ensure that after a document is shared it is assigned to a hearing date. This is important as it will inform the judge and court of the documents you intend to rely on at a scheduled hearing.
5.1 Adding and Sharing Documents
To add a document to the DHW of a case:
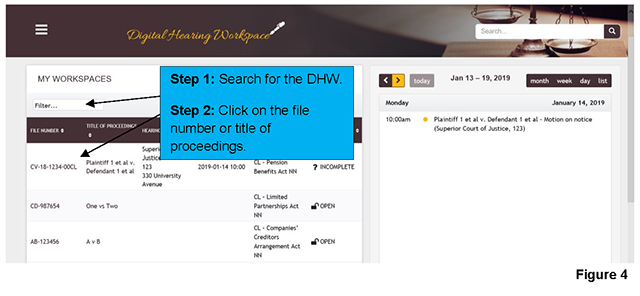
- Search for the case in the DHW homepage. [Figure 4]
- Click on the court file number or title of proceedings to access the DHW. [Figure 4]
Note: Users may also access the DHW for a case by clicking on the event hyperlink in the calendar section.
- Click on the “+” sign under the “CREATE / UPLOAD DOCUMENTS” section. [Figure 5] A pop-up box will appear.

- Click anywhere in the box under “UPLOAD FILES”. [Figure 6]
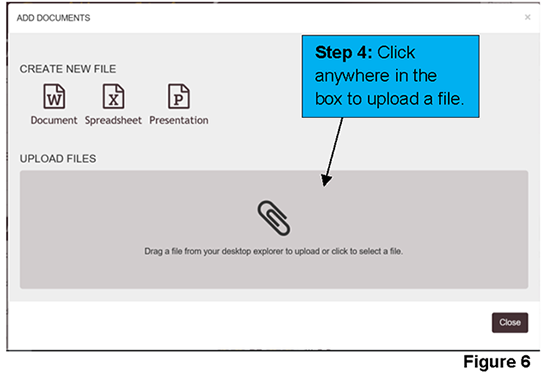
- Locate the file on your computer and click the “Open” button.
- Close the pop-up window and the document will appear in your “CREATE / UPLOAD DOCUMENTS” section. [Figure 7]
- Select the type of document that is being shared by clicking on the drop down menu under the column titled “DOC. TYPE”. [Figure 7]
- Select the party on whose behalf the document is being shared by clicking on the drop down menu under the column titled “ON BEHALF OF”. [Figure 7]
- Click on the “Select Action” drop down menu under the “ACTIONS” column to download, open, delete or share your document. [Figure 7]
Note: To make changes to your document, select “Open” under the “ACTIONS” column or click on the document file name.
- When a document is ready to be shared with all users who have access to the workspace, select “Share” under the “Select Action” drop down menu. [Figure 7]

Note: Before a sharing a document, verify that the correct document and/or version has been uploaded. A document cannot be easily removed from the DHW after it has been shared.
Note: The file name of documents that are uploaded in the DHW must follow the naming convention outlined in The Guide Concerning e-Delivery of Documents in the Ontario Superior Court of Justice.
- After sharing a document, assign the document to an upcoming scheduled hearing. Under the “MY SHARED DOCUMENTS” section, click on the “Assign documents to hearings” button. [Figure 8] A pop-up box will appear.

Note: This is an important step that must be completed as it will inform the judge and court of the documents you intend to rely on at the scheduled hearing.
- Select the hearing to which you want to assign documents from the drop down menu. [Figure 9]
- Select the document you want to assign to the selected hearing date and click on the arrow key. [Figure 9]
- Click “Save” to assign the document. [Figure 9]
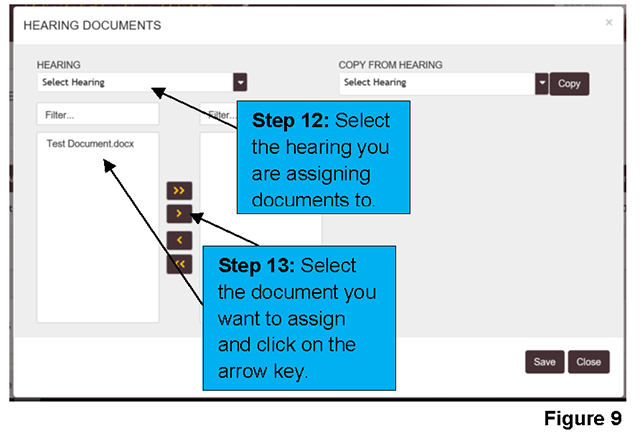
Note: If you wish to assign all documents shared on a previous hearing date to a new hearing date, click on the “COPY FROM HEARING” drop down menu and select the hearing date and click “Copy”. Click “Save” to assign the documents.
After a document has been shared:
- An email is sent to all users assigned to the workspace notifying them that a document has been shared and is available to view.
- It will appear under either the “PLAINTIFFS/APPLICANTS DOCUMENTS” section or the “DEFENDANTS/RESPONDENTS DOCUMENTS” section and in the “MY SHARED DOCUMENTS” section in the case’s DHW.
Note: A document that is shared in the DHW is not considered filed with the court and must be filed at the courthouse in accordance with the Rules of Civil Procedure and applicable Practice Directions. The paper documents filed will continue to be considered the official record.
It is the responsibility of the user sharing a document in the DHW to ensure that it is the same as the paper copy filed with the court.
5.2 Creating and Sharing Documents
To create a document in the DHW of a case:
- Search for the case in the DHW homepage. [Figure 10]
- Click on the court file number or title of proceedings to access the DHW. [Figure 10]

Note: Users may also access the DHW for a case by clicking on the event hyperlink in the calendar section.
- Click on the “+” sign under the “CREATE / UPLOAD DOCUMENTS” section. [Figure 11] A pop-up box will appear.

- Click on the appropriate document type to create a new file under “CREATE NEW FILE’. [Figure 12]
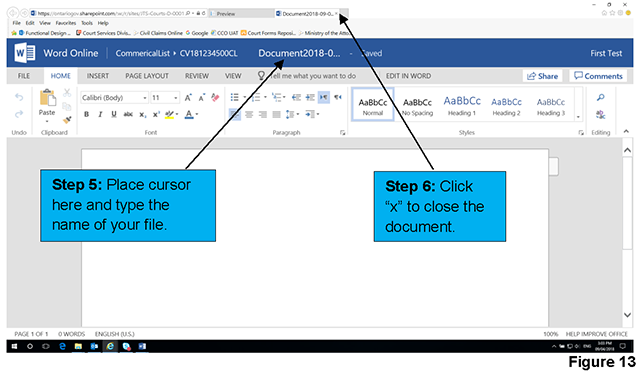
Note: A new window will appear with an online version of the document you selected to create. See Figure 13 for an example of an online Word document.

- Enter the name of the file at the top of the screen and press enter. [Figure 13]
- After completing the edits to the document, close the window to close and save the document. [Figure 13]
Note: Any edits or changes made to the document will be automatically saved as you make edits and upon closing the window.
Note: The document created will appear in your “CREATE / UPLOAD DOCUMENTS” section. [Figure 14]
Note: The name of the file will only appear after you have refreshed the page. Press F5 on the keyboard to refresh the page.
- Select the type of document that is being shared by clicking on the drop down menu under the column titled “DOC. TYPE”. [Figure 14]
- Select the party on whose behalf the document is being shared by clicking on the drop down menu under the column titled “ON BEHALF OF”. [Figure 14]
- Click on the “Select Action” drop down menu under the “ACTIONS” column to download, open, delete or share your document. [Figure 14]
Note: To make changes to your document, select “Open” under the “ACTIONS” column or click on the document file name.
- When a document is ready to be shared with all users who have access to the workspace, select “Share” under the “Select Action” drop down menu. [Figure 14]

Note: Before a sharing a document, verify that the correct document and/or version has been uploaded. A document cannot be easily removed from the DHW after it has been shared.
Note: The file name of documents that are created in the DHW must follow the naming convention outlined in The Guide Concerning e-Delivery of Documents in the Ontario Superior Court of Justice.
- After sharing a document, assign the document to an upcoming scheduled hearing. Under the “MY SHARED DOCUMENTS” section, click on the “Assign documents to hearings” button. [Figure 15] A pop-up box will appear.

Note: This is an important step that must be completed as it will inform the judge and court of the documents you intend to rely on at the scheduled hearing.
- Select the hearing to which you want to assign documents from the drop down menu. [Figure 16]
- Select the document you want to assign to the selected hearing date and click on the arrow key. [Figure 16]
- Click “Save” to assign the documents. [Figure 16]
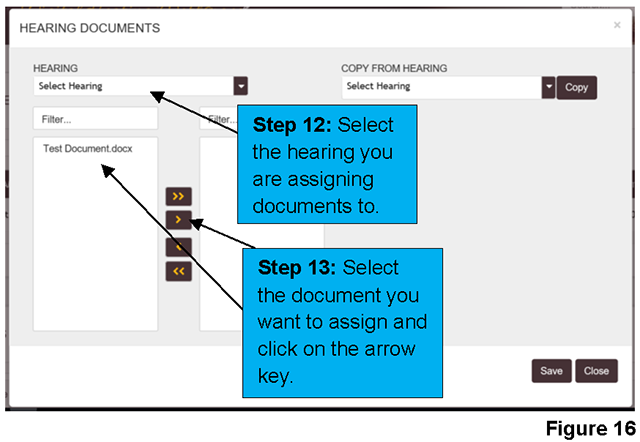
Note: If you wish to assign all documents shared on a previous hearing date to a new hearing date, click on the “COPY FROM HEARING” drop down menu and select the hearing date and click “Copy”. Click “Save to assign the documents.
After a document has been shared:
- An email is sent to all users assigned to the workspace notifying them that a document has been shared and available to view.
- It will appear under either the “PLAINTIFFS/APPLICANTS DOCUMENTS” section or the “DEFENDANTS/RESPONDENTS DOCUMENTS” section and in the “MY SHARED DOCUMENTS” section in the case’s DHW.
Note: A document that is shared in the DHW is not considered filed with the court and must be filed at the courthouse in accordance with the Rules of Civil Procedure and applicable Practice Directions. The paper documents filed will continue to be considered the official court record.
It is the responsibility of the user sharing a document in the DHW to ensure that it is the same as the paper copy filed with the court.
You will receive an email notification whenever a document has been shared in the DHW of cases that are assigned to you.
To view documents that have been shared in a case, log into the DHW platform and access the case’s workspace. On the DHW case landing page of the case, click on the document’s file name under either the “PLAINTIFFS/APPLICANTS DOCUMENTS” section or the “DEFENDANTS/RESPONDENTS DOCUMENTS” section. [Figure 17]
You can view all documents that have have been shared or you can filter by documents shared for a scheduled hearing date. [Figure 17]
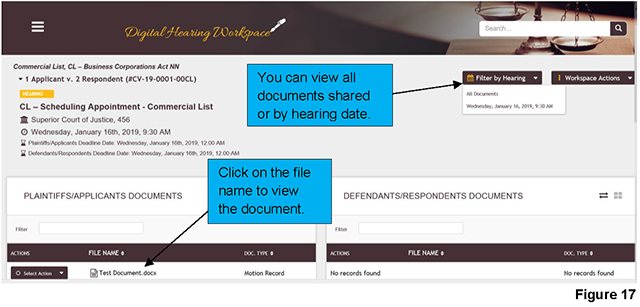
The document will open in a new window for viewing.
You may make notes or highlight sections within documents that have been shared. Annotations may be made in accordance to the functionality of the document type uploaded. These annotations will only be visible to you and not by other users.
Note: After a case has been disposed of by final decision, the DHW will be closed and users will no longer have access to that workspace, including any documents that have been uploaded to the workspace.
7 Frequently Asked Questions
Question: I don’t have access to the Digital Hearing Workspace. How can I get it?
Answer: You will receive an email invitation to register for the Digital Hearing Workspace after booking an event with the Trial Office for the Commercial List on/after February 11, 2019. The invitation includes a link and instructions for the one-time registration process. Pre-registration is not required or offered.
Question: How are Commercial List matters assigned to the DHW?
Answer: A DHW is created for all Commercial List matters where an event has been scheduled on/after February 11, 2019.
Question: Who sends the email invitation to register when a DHW is created or when a document is shared?
Answer: The DHW platform automatically sends email invitations when court staff add a new user to the DHW and emails notifications when a user shares a document in the DHW.
Question: We would prefer for our law clerks to manage our case’s DHW. Can they register to access and upload documents?
Answer: Currently, only parties in a case and their representatives are invited to register for the DHW. Further consideration is being given to enabling law clerks to register for the DHW.
Question: Can I grant my colleagues access to the DHW by forwarding them my email invitation to register?
Answer: Email invitations to register for the DHW are unique to the email address they are sent to. For security reasons, if another person attempts to register with your invitation, the platform will reject the registration.
Question: Is the email notification sent when a document is shared considered to be service of the document?
Answer: The DHW platform is not a court filing service or a method for service of documents. Documents shared in the workspace are not considered filed with the court and must be served and filed at the courthouse in accordance with the Rules of Civil Procedure and applicable Practice Directions. The paper court documents filed will continue to be considered the official court record. Please refer to the User Guide for more information.
Question: How long does it take for cases to be created and hearing dates to be scheduled in the DHW?
Answer: Upon receipt of a request to schedule an event, court staff will create a DHW for the case (if one does not already exist) and schedule the event within 1 (one) business day. Depending on the date requested, court staff may complete this process sooner.

